Get started by deploying greymatter on Kubernetes using a GitOps pattern, which is flexible enough to support a simple quick start to complex enterprise deployments. We supply a Kubernetes Operator to install the core components of the greymatter platform into a Kubernetes cluster.
Install Prerequisites
Get started by installing the required prerequisites.
If you do not have a greymatter.io account with access to the greymatter image registry, contact us at https://support.greymatter.io/support/home.
Create Identity Token
Create an Identity Token in jFrog. This will allow you to pull down greymatter release images when installing the mesh in a later step.
Option 1: From Your Browser
- Navigate to greymatter jFrog
- Click
Generate an Identity Token - Copy the token and save it to a secure place
Option 2: From Your Terminal
jf c add --url https://greymatter.jfrog.io --user <username> --password <api_key> --interactive=false
jf rt access-token-create <username>
Establish greymatter Core Git Repository
Set up a GitHub repository for a base greymatter installation. You can use other Git providers like GitLab as well. Additional reading on our configuration management philosophy is recommended to help understand why we use Git and CUE for managing mesh configurations.
Create a private repository named
greymatter-corein your GitHub organization. For simple dev-test deployments, you can use your personal account. A private repository is important so you have full control over configuration changes.Initialize your new repository by running the following commands. Be sure to change
git@github.com:<your-org>/greymatter-core.gitto contain your actual organization name.curl -u <your email>:<your identity token> -o greymatter-core.tar.gz "https://greymatter.jfrog.io/artifactory/generic/greymatter-core/greymatter-core_0.16.6_none_none.tar.gz" mkdir greymatter-core tar -xvf greymatter-core.tar.gz -C greymatter-core cd greymatter-core git init git remote add origin git@github.com:<your-org>/greymatter-core.git git checkout -b main git add -A git commit -m "start of your greymatter journey" git push --set-upstream origin mainIf there are no errors during this process and you see
<your-org>/greymatter-corepopulated with greymatter Core CUE configurations, then you’re ready for the next step.
Install greymatter Base Fabric
Prepare Mesh Settings
Let’s start by first discussing a couple of settings in <your-org>/greymatter-core repository. By default, greymatter will install Prometheus into your Kubernetes cluster to support historical metrics visualization in our dashboard. If you want this feature, ensure that your Kubernetes environment has enough resources. Please see the prerequisites for details.
If you choose to disable this feature before the mesh is installed, navigate to <your-org>/greymatter-core repository and edit inputs.cue by changing enable_historical_metrics to false (this is in the config block).
config: {
  enable_historical_metrics: bool | *false @tag(enable_historical_metrics,type=bool)
}
Secondly, greymatter will install an audit pipeline that has a dependency on an external Elasticsearch. There is no requirement at install time to have Elasticsearch available, and you may configure the audit pipeline to use Elasticsearch after installation.
If you choose to disable this feature before the mesh is installed, navigate to <your-org>/greymatter-core repository and edit inputs.cue by changing enable_audits to false (this is in the config block).
config: {
  enable_audits: bool | *false @tag(enable_audits,type=bool)
}
Another important note is that the operator watches namespaces for sidecar injection. Sidecar injection is an “opt-in” approach. Greymatter will only inject sidecars into pods in namespaces that you designate. To add namespaces that the operator watches, navigate to <your-org>/greymatter-core repository and edit inputs.cue and additional namespaces to the list.
mesh: meshv1.#Mesh &{
  spec:{
    watch_namespaces:  [...string] | *["default", "examples"]
  }
}
We have added the examples namespace for later use in these docs. If you don’t need the operator to watch the default and examples namespaces, remove them. Greymatter does not deploy core resources to the default Kubernetes namespace but if you deploy your own resources to the default namespace and you would like the operator to inject sidecars, leave it in the list.
Push your changes to the remote repository so that the operator will use these settings when installing the mesh.
Install on Kubernetes
Create the operator namespace
kubectl create namespace gm-operatorCreate the SSH key secret that the operator will use to pull configuration from
<your-org>/greymatter-corerepository.Note that you must include the host keys so that the git server can be authenticated.
ssh-keyscan github.com > known_hostskubectl create secret generic greymatter-sync-secret \ --from-file=ssh-private-key=<path to private key> \ --from-file=known_hosts=<path to known hosts file> \ -n gm-operatorSet
greymatter.jfrog.ioDocker registry environment variables.export GREYMATTER_REGISTRY=greymatter.jfrog.io export GREYMATTER_REGISTRY_USERNAME=<greymatter_artifactory_username> export GREYMATTER_REGISTRY_PASSWORD=<greymatter_artifactory_identity_token>Create the secret used for pulling Docker images from
greymatter.jfrog.io.kubectl create secret docker-registry gm-docker-secret \ --docker-server=$GREYMATTER_REGISTRY \ --docker-username=$GREYMATTER_REGISTRY_USERNAME \ --docker-password=$GREYMATTER_REGISTRY_PASSWORD \ --docker-email=$GREYMATTER_REGISTRY_USERNAME \ -n gm-operatorOpen
<your-org>/greymatter-core/generated-manifests/operator.yamlor<your-org>/greymatter-core/generated-manifests/operator-spire.yamlif using SPIRE.Search for the
argsblock, and change the value ofgit@github.com:<your-org>/greymatter-core.gitto contain your GitHub organization and repository name.args: - -repo - git@github.com:<your-org>/greymatter-core.git - -sshPrivateKeyPath - /app/.ssh/ssh-private-key - -branch - main # optional - -sshPrivateKeyPassword - YOUR_SSH_KEY_PASSWORDIf you are using your own image/image repository update the operator statefulset’s image, in
<your-org>/greymatter-core/generated-manifests/operator.yaml.Now, apply the operator manifest to your Kubernetes cluster.
kubectl apply -f generated-manifests/operator.yamlor, if leveraging spire
kubectl apply -f generated-manifests/operator-spire.yaml
Verify Installation
At this point, the operator should be deployed. It will take less than a minute to configure the mesh, you can tail the logs to monitor its activity.
kubectl logs -f greymatter-operator-0 -n gm-operator
When you see a log message that looks like the following, the operator will have begun the process of configuring the mesh.
{"level":"info","ts":1663338550.800288,"logger":"mesh_install","msg":"Installing Mesh","Name":"greymatter-mesh"}
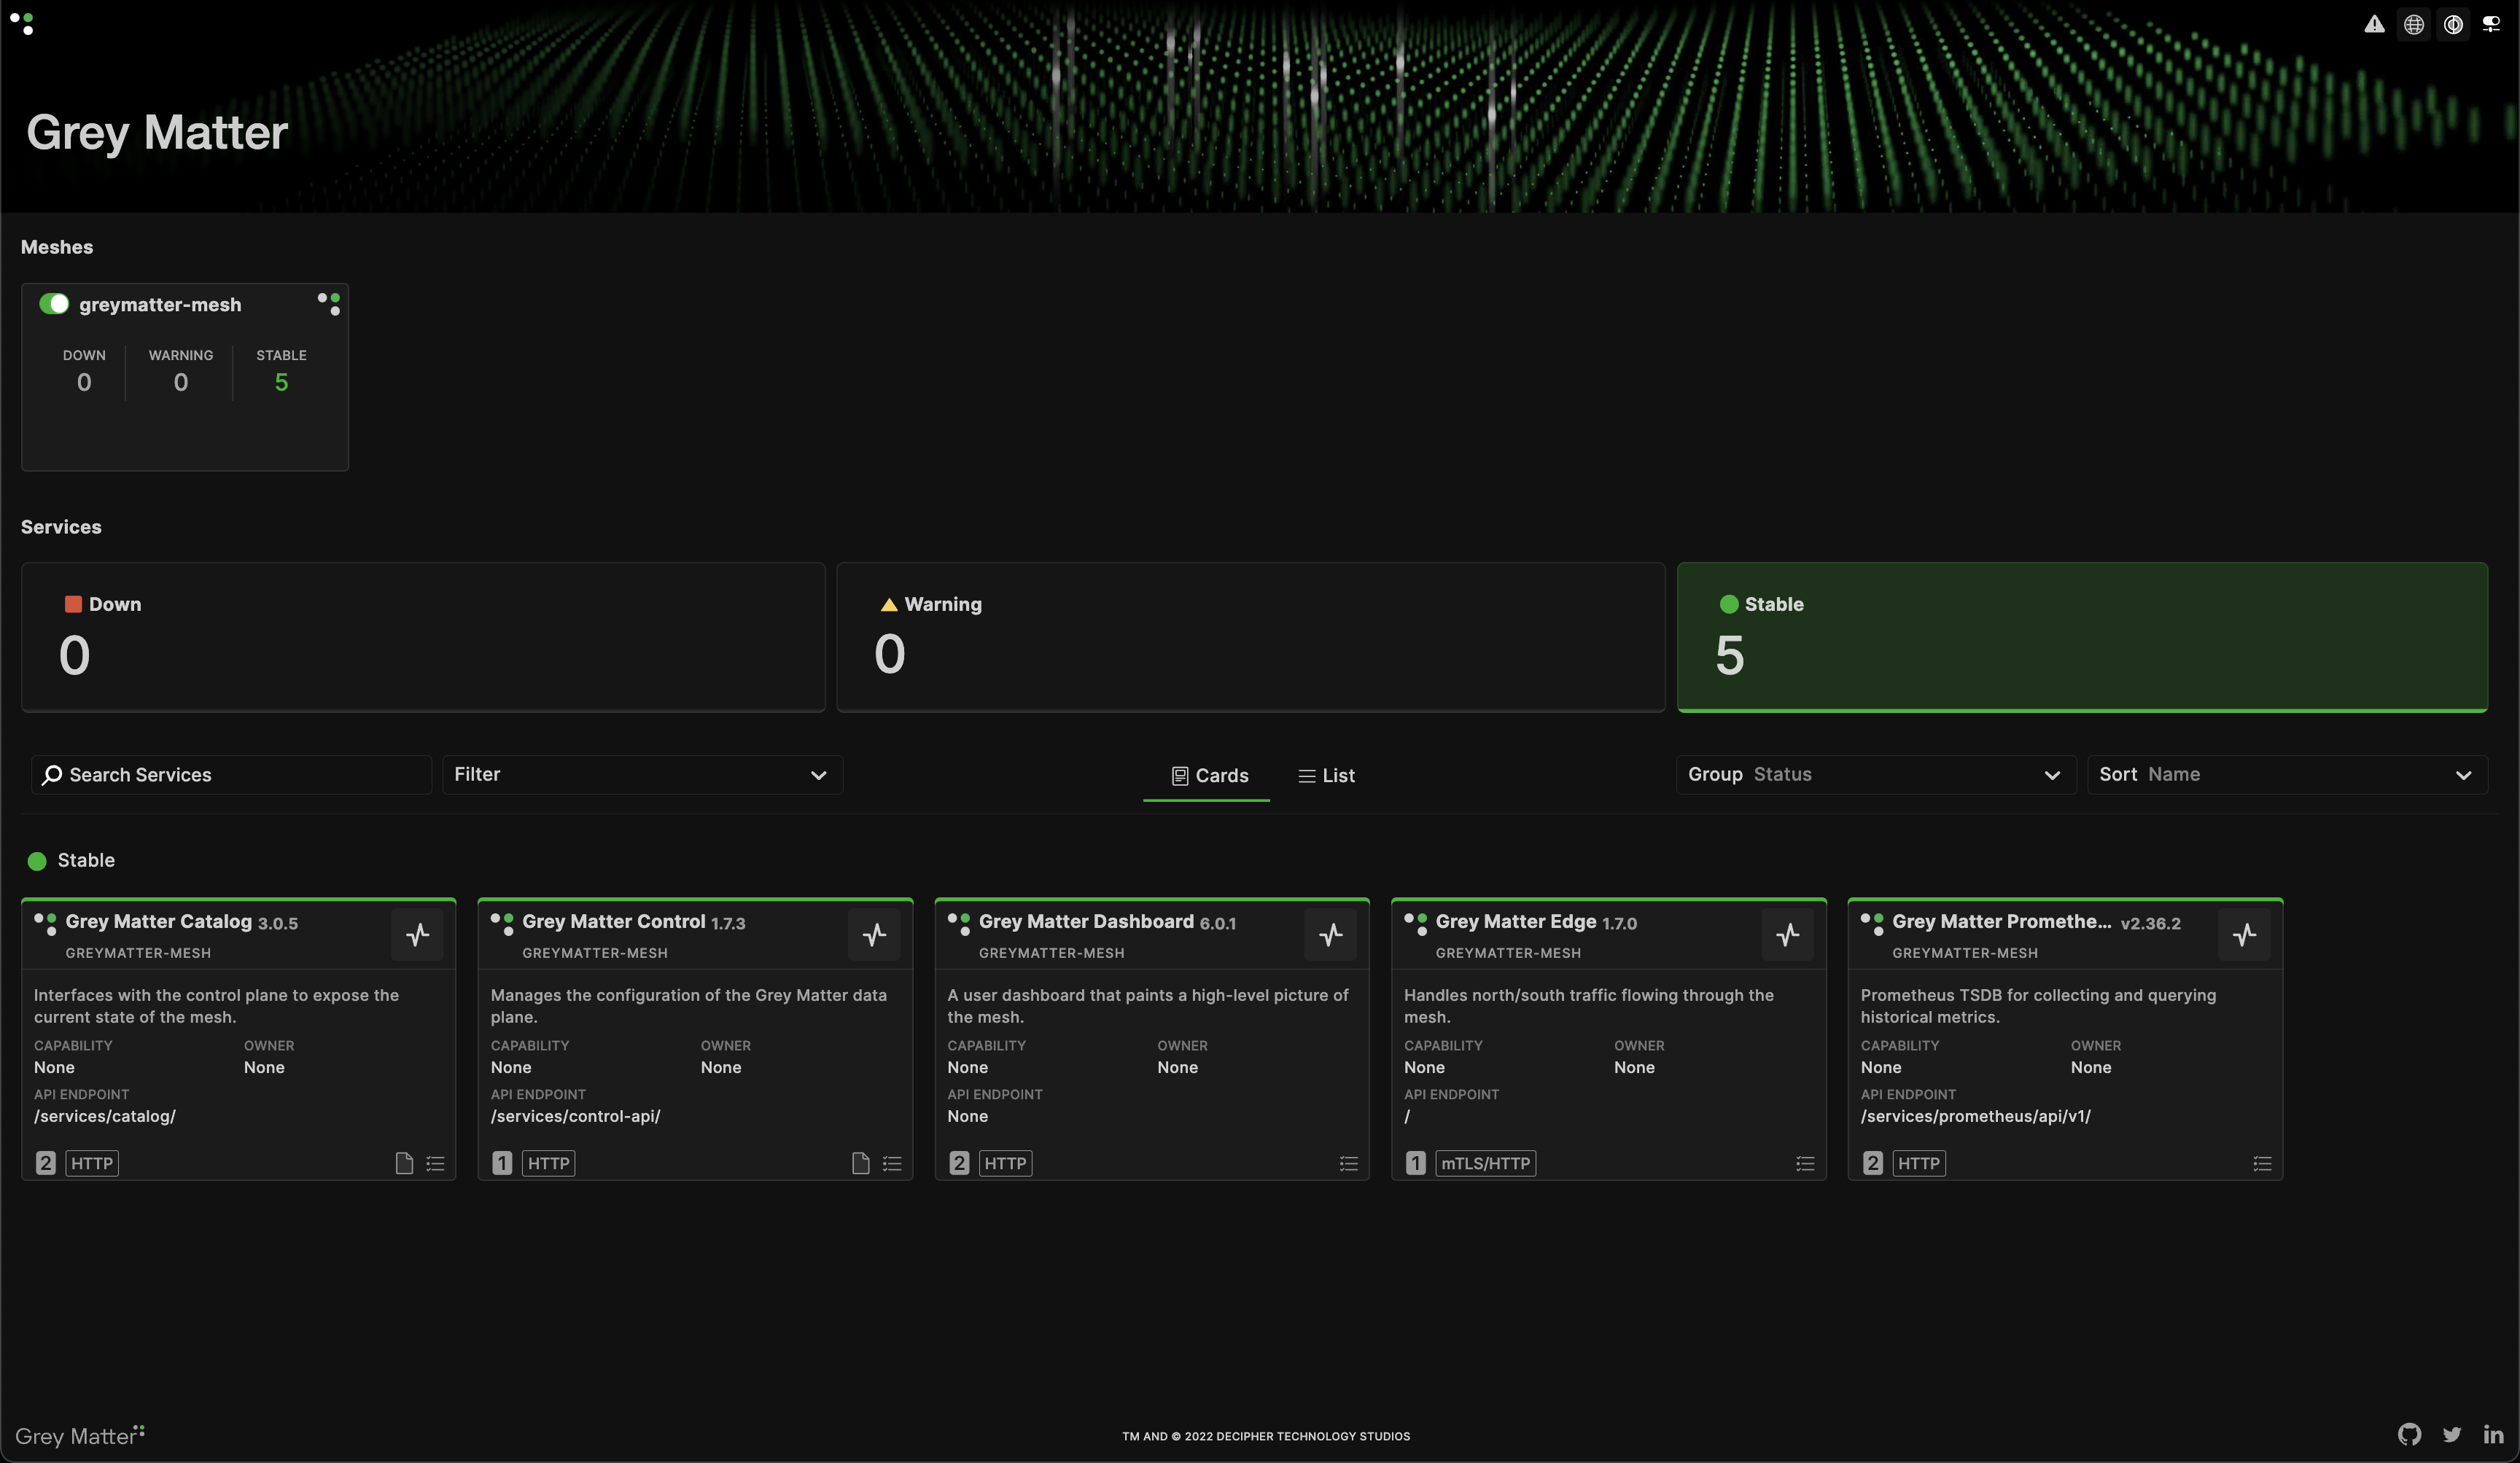
Once completed, the operator will have downloaded the core mesh components, installed the service Catalog API, an Edge Gateway, greymatter Data Store, the Dashboard Application, and the service mesh Control Plane ensemble.
Everything was configured from the configurations found in <your-org>/greymatter-core Git repository and you have full control over these core services going forward.
You can run the below command to ensure that pods deploy successfully. This process will take a moment, so no output is expected until the operator deploys the Kubernetes resources.
kubectl get pods -n greymatter -w
This will watch for pods in the greymatter namespace. When you see the following in your console, you are ready to move on to the next step.
NAME                         READY   STATUS    RESTARTS   AGE
catalog-[random-pod-id]      2/2     Running   0          5m
controlensemble-0            3/3     Running   0          5m
dashboard-[random-pod-id]    2/2     Running   0          5m
edge-[random-pod-id]         1/1     Running   0          5m
redis-0                      2/2     Running   0          5m
If you have enabled historical metrics, you will also see:
prometheus-0 2/2 Running 0 5m
If you have enabled audits, you will also see:
vector-agent-[random-pod-id]  0/1     CreateContainerConfigError   0          5m
observables-[random-pod-id]   1/2     CreateContainerConfigError   0          5m
You can finalize the audit pipeline configuration in the Prepare Audit Pipeline step.
Once you see the above in your terminal, you need to run the below command to get the external IP exposed from the edge service.
kubectl get svc edge -n greymatter
You should see an output like:
NAME   TYPE           CLUSTER-IP   EXTERNAL-IP     PORT(S)           AGE
edge   LoadBalancer   x.x.x.x      {EXTERNAL-IP}   10808:32021/TCP   48m
Navigate to http://{EXTERNAL-IP}:10808 in your web browser.
Congratulations! You now have a fully operational greymatter.io enterprise microservices platform!
Prepare Audit Pipeline
The audit pipeline’s only external dependency is Elasticsearch. If you do not have Elasticsearch, you can skip this step.
To complete the installation of the audit pipeline, complete the following steps.
Create a user with basic authentication credentials in Elasticsearch.
The default password in the
elastisearch-passwordsecret is insecure. For security purposes please recreate it.kubectl delete secret elasticsearch-password -n greymatter kubectl create secret generic elasticsearch-password --from-literal=password=$YOUR_PASSWORD -n greymatterOnce you have recreated the secret, delete the audit pipeline pods to pick up the updated secret.
kubectl delete pods -l app.kubernetes.io/name=greymatter-audit-agent -n greymatter
kubectl delete pods -l greymatter.io/cluster=observables -n greymatter
Finally, update
inputs.cuewith the Elasticsearch hostname and port and push the changes to<your-org>/greymatter-coreGit repository.audits: { elasticsearch_host: '' elasticsearch_port: 443 }
Now that all updates have been made, learn how to use the audit application.